
No products in the cart.
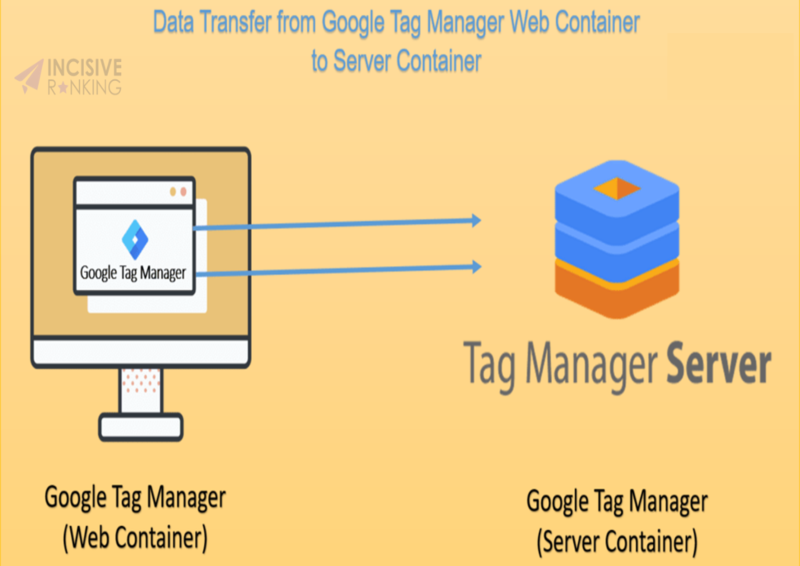
Transfer GTM Web Container Data to Server: Complete Setup + Common Mistakes
Most teams that migrate to the GTM server-side lose tracking data for 3-7 days during the transition. Some don’t notice for weeks. By then, their ad optimization has been running on garbage data.
What this guide solves: This guide walks you through transferring your GTM web container data to a server container step by step, with the exact config snippets we use for client migrations.
Before you start: are you confident your CURRENT client-side tracking is accurate? Most teams discover 15-30% data leaks when they audit. Run a free tracking audit to check – it takes 2 minutes and shows you exactly what’s broken before you migrate.
⚠️ Before You Migrate: Audit Your Current Setup
Migrating broken client-side tracking to server-side just gives you faster broken tracking. Check these 5 things before touching your server container:
Data Layer Completeness: Open your site → GTM Preview → check if every interaction pushes a dataLayer event. Missing events = missing conversions after migration.
Duplicate Tags: Run Tag Assistant or check GTM Preview. Duplicate GA4 config tags will create duplicate server-side requests.
Consent Mode Implementation: If you’re in EU/UK, verify consent mode is firing BEFORE tags. Server-side doesn’t bypass consent — it enforces it.
Conversion Mismatch: Compare GA4 conversions vs your backend/order count. If there’s already a >10% gap, you have a client-side problem that migration won’t fix.
Enhanced Measurement Conflicts: GA4’s automatic events (page_view, scroll, etc.) can duplicate with your manual implementations. Decide which to keep BEFORE migrating.
Not sure if your setup passes these checks?
Our free tracking audit scans your GTM implementation and flags exactly these issues with screenshots and fix instructions.
How to Send Data from GTM Web Container to Server Container
Before diving into the Data Tag method, let’s cover the simpler native approach first. If you only need to send GA4 data to your server container, this might be all you need.
Method 1: Native GA4 Transport (Simple)
This is the fastest way to connect your web container to the server container — but it only works for GA4 data.
Steps:
- Open your client-side GTM container and go to the Tags tab
- Click on your GA4 Configuration tag
- Check the box labeled “Send to server container”
- Enter your Server Container URL (the custom domain you set up, e.g., sst.yourdomain.com)
- Click Save, then Submit and Publish your container
- Limitation: This method only sends GA4 event data. You can’t send custom data layer values, user parameters for Meta CAPI, or data arrays through this method. For that, you need Data Tag.
Data Tag Definitions
Not every field in the Data Tag needs to be filled. Here’s what each one does, and which ones matter for most setups.
Event Name: You can either send a conventional event from the dropdown menu or a custom event. You can add variable events using the custom event, and in this case, the Data Tag will deliver all events you see inside the preview mode.
The GTM Server Side domain is necessary. Tagging server URLs can be found in your Google Tag Manager Server container settings. This domain will be used by Data Tag to send requests.
Send all from Data Layer: Enables sending all data layer values to the server container automatically. You don’t need to map each variable manually.
Send common data: When enabled, Data Tag sends page_location, page_path, page_hostname, page_referrer, page_title, page_encoding, screen_resolution, and viewport_size.
Event Data: Add custom event parameters to send to the server container. Enter parameter names and values — you can use GTM variables, static text, or apply transformations like Trim, To Lowercase, and Hash.
User Data: Send user parameters (email, name, phone) for improved Meta CAPI event matching. Choose a parameter name, enter a value or variable, and optionally apply transformations. If you use Data Tag + Data Client + Facebook CAPI, the Facebook tag automatically pulls user data from here.
Settings: Change the request method (default is POST, can switch to GET), custom path, and protocol version.
Advanced Settings: Standard GTM tag settings (firing priorities, sequencing, etc.).
For Most Ecommerce Setups, You Only Need These Three:
- Event Name: Set to
{{event}}to capture all events - Send all from Data Layer: Enabled
- Send common data: Enabled
Everything else is optional and depends on your specific use case. Not sure which settings are right for your setup? Get a free audit → and I’ll tell you exactly what to configure.

Data Tag vs Native GA4: Quick Comparison
There are two methods for sending data from the browser to the server container. Here’s when to use each:
Data arrays: Data Tag can send arrays (like product items in an ecommerce purchase). The native GA4 method can’t — it will break if you try to pass an array.
Bulk data layer transfer: Data Tag sends your entire data layer to the server in one request. With GA4, you must manually map each variable.
Cross-page data storage: Data Tag can save variables to local storage and pass them between pages (e.g., user email from a form page to a thank-you page). GA4 has no storage capability.
Data transformation: Data Tag can hash, trim, and lowercase values before sending. GA4 sends values as-is.
| Feature | Native GA4 Method | Data Tag + Data Client |
|---|---|---|
| Setup difficulty | Easy | Medium |
| Send data arrays | ❌ No | ✅ Yes |
| Send all data layer values | ❌ Manual mapping | ✅ One toggle |
| Data transformation (hash, trim, lowercase) | ❌ No | ✅ Yes |
| Store data between pages | ❌ No | ✅ Local storage |
| Send to non-GTM endpoints | ❌ No | ✅ Webhooks, Slack, CRM |
| Custom request path/method | ❌ No | ✅ Yes |
| Best for | Simple GA4-only setups | Ecommerce, CAPI, Multi-platform |
How to Set Up Data Tag + Data Client (Step by Step)
I’ll use a purchase event as the example, but this process is the same for all events.
- From the Template Gallery, add a Data Tag to your GTM Web container
- Download the Data Client from [GitHub] → Open your Server container → Templates tab → Click New in the Clients section → Click the three dots → Import → Save
- In your Web container, create a New Tag → Select Data Tag → Set event name to
{{event}}or choose a specific event → Enter your GTM Server Side URL → Add event data and user data (or enable “Send all from Data Layer”) - Select the event’s trigger and click Save
- In your Server container, go to Clients → Add new client → Select Data Client → Save
- Publish the server container
- Open both web and server container Preview modes → Trigger the event on your site → Verify the server container receives the Data Tag request
- Once confirmed, publish the web container
5 Practical Data Tag Use Cases
1. Pass Your Full Data Layer to the Server Container
The most common use case. Instead of manually mapping each variable, Data Tag sends everything from your web data layer to the server in one request. Your server-side tags can then pull whatever parameters they need.
Settings to use:
- Custom event:
{{event}} - Enable: Send all from Data Layer
- Enable: Send common data
Apply this Data Tag to all ecommerce events. In the server container Preview mode, you’ll see Data Tag firing on every event, and Data Client receiving all parameters in the event_data object.
2. Send User Data for Meta CAPI Event Matching
To improve your Meta event match quality, you need to send user data (email, name, phone) through the server. Data Tag makes this straightforward — and if you use Data Tag + Data Client + the Facebook CAPI tag, the Facebook tag automatically pulls user data from the Data Tag.
To verify: Add your Facebook test ID to the Facebook server tag, then check the Events Manager testing tool to confirm which parameters Facebook received.
3. Send Data to Slack, Webhooks, or Your CRM
Data Tag doesn’t just send data to your GTM server — you can route it to any endpoint. For example, send a Slack notification every time a purchase occurs on your site.
Steps:
- Use Data Tag to send the right data from your web container
- Create a webhook in Slack (follow [Slack’s webhook tutorial])
- In your server container, add a new HTTP Request tag
- Set the target URL to your Slack webhook URL
- Set the method to POST
- Add the message text and parameters in the Request body
4. Store Data Between Pages
GTM can’t natively store data and pass it between pages. This becomes a problem when user data is available on a form page but not on the thank-you page — and you need it for Meta CAPI matching.
Data Tag solves this with local storage:
- Create a Data Tag that reads user parameters from the data layer and enables the storing option next to each value you want to save
- This tag fires when the user submits the form (e.g., “Submit Application” button click)
- Create a second Data Tag on the thank-you page that retrieves the stored data and sends it to the server container
This ensures user data reaches Meta CAPI even when it’s not available on the conversion page.
5. Handle Custom Incoming Requests
Data Client can receive requests from any source, not just Data Tag. By changing the Path Settings in the Data Client configuration, you can use it to capture data from webhooks, CRMs, or third-party platforms and process it inside your server container.
Learn More About What is Server Side Tracking?
Summary
Transferring data from your GTM web container to a server container gives you more control over your tracking, bypasses most ad blockers, and lets you route data to multiple platforms from one place.
Two methods to send web data to the server:
- Native GA4 transport_url: Simple but limited — no arrays, no data transformation, no cross-page storage
- Data Tag + Data Client: Full control — supports arrays, bulk data layer transfer, data transformation, and local storage
For most ecommerce setups, Data Tag is the better choice because it handles product arrays natively and lets you pass user data for Meta CAPI matching.
Not Confident in Your Setup?
You’ve read the guide. But implementing server-side tagging is where things break silently — missing events, duplicate requests, data layer mismatches that don’t show up in Preview mode.
I audit GTM setups daily. Here’s what I check:
- Data layer completeness — are all events actually pushing?
- Server container receiving and forwarding data correctly
- No duplicate tags firing (client + server double-counting)
- Consent mode configured properly
- Data Tag configuration — are the right settings enabled for your setup?
The audit is free. I’ll send you screenshots of every issue I find with fix instructions.




Free GTM & Server-Side Tracking Audit
(add id=”audit-form” to this heading in WPBakery)
Tracking errors silently cost you revenue. A misconfigured data layer, a duplicate tag, or a broken server container request means you’re optimizing ads on incomplete data.
What I’ll check:
- Your GTM web container: tag firing order, data layer pushes, consent mode
- Your server container: clients receiving data, tags forwarding correctly
- Data Tag setup (if applicable): event data, user parameters, storage
- Platform-specific checks: GA4, Meta CAPI, Google Ads conversions
- Conversion accuracy: comparing tracked conversions vs expected
What you’ll get:
- Screenshot evidence of every issue
- Step-by-step fix instructions
- Priority ranking (fix this first, then this)
- No obligation — the audit report is free
Fix it now
✓
Ticket submitted
Our team will diagnose your issue and reach out to you shortly.
I am also available here!


