The Facebook Pixel is an extremely useful tool for tracking company data on Facebook. Unfortunately, its efficacy has declined in recent years. But all is not lost, due to Facebook conversion API.
The Facebook conversion API is another tool in your Facebook data toolkit that works with the Facebook pixel to guarantee you acquire all of the data you require. Together, they enable you to accurately track, attribute, and improve your Facebook marketing success.
What is the issue with the pixel?
Ad blockers, cookie blockers, and other masking techniques have started to reduce the amount of data the pixel receives. And now, Apple’s iOS 14 upgrade makes it even more difficult to track data using the pixel.
The iOS 14 upgrade significantly limits the usage of cookies for tracking on Apple mobile devices. As a result, the pixel will provide you with far less information on how iOS users interact with your business. You may be unaware that someone has clicked through from Facebook to your website.
Do not panic. Continue reading to learn how to use the Facebook conversion API to preserve data, assign attribution, and target users. Before moving any further, we should learn about certain basic terms which will be used in this blog.
Basic Terms:
Here are some of the basic terms below with definitions:
API: API stands for application programming interface. It connects two applications and allows them to communicate with each another. In this example, it refers to your website and Facebook.
Web and offline events: People who have interacted with your Facebook Ads may have made activities on your website (viewed a page, filled out a form, etc.) or offline (such as calling you).
Your server: For the purposes of this essay, “your server” refers to the machine that hosts your website and all of its associated data. Large organizations may have their own servers, whereas small firms typically pay to have their website hosted on someone else’s server (such as GoDaddy or Bluehost’s).
Facebook’s server: Facebook has thousands of its own servers, one of which hosts Ads Manager. “Facebook’s server” refers to the machine that stores Ads Manager data.
So, the Facebook Conversions API connects your website data (hosted on your server) to Facebook advertising Manager (hosted on Facebook’s server), allowing you to monitor how Facebook users interact with your advertising.
What is Facebook Conversion API?
Facebook Conversion API was formerly known as Facebook Server-Side API. It is intended to assist businesses in providing targeted advertising experiences to audiences while protecting data privacy.
This utility enables you to send web events from their respective servers directly to Facebook. The entire process does not rely on browser-based mechanisms, such as cookies.
The Meta Conversion API is intended to exist on the server side of your website (as the name implies), passing events to the browser pixel that is installed.
Facebook Cookieless Tracking
The deactivation of third-party cookies helps to promote data privacy. However, this has presented a significant problem to businesses around the world. Brands could no longer rely on cookies to create successful user targeting strategies while also measuring campaign performance.
In the past, you could track Facebook ad campaigns by entering a sequence of Javascript code lines and letting Facebook Pixel handle the rest. Nowadays it’s no longer the same.
The conversions API combats Facebook cookieless tracking by allowing data to be shared directly from your company’s server rather than through a browser. The data in the API is delivered directly to Facebook and treated in the same way as pixel events.
Once completed, you can monitor the conversions and make modifications as needed via the Meta Ads Manager. This is done while respecting the user’s privacy preferences.
Facebook Conversion API and Data Privacy
With the development of Intelligent Ad Tracking Prevention (ITP) solutions, browsers are phasing out all third-party data.
Instead of sharing data with the browser, businesses can utilize the Meta Conversions API to communicate relevant data with Facebook via their server.
This means that if a consumer utilizes a privacy tool for non-Facebook activity, their actions will also apply to data submitted via the Conversions API.
So, where does the end user opt-in to be recorded?
The user opt-in is saved on your website. When using the Meta Conversions API to upload conversion activity, Facebook receives this approval. If the user opts out, a new event is triggered with this information, thus removing it from the audience.
Furthermore, there are significant distinctions between how cookies gather data and how APIs acquire data. In summary, what cookie-based data can be acquired depends entirely on end-user browser options, particularly when it comes to ad-blocking plugins.
Instead of relying on these constraints, the Facebook Conversion API transmits server events. This Blueprint training can serve as a resource for additional information. So far you have learned about some basic terms, Facebook CAPI, cookieless tracking, and its immense love for data privacy. Now we will see the reasons why we should use Facebook CAPI.
Is Facebook Conversion API setup correctly on your website? Get a Free Audit.
Now that you understand how Facebook CAPI works, you can better appreciate the tool’s advantages.
CAPI fixes VPNs and ad blockers.
Originally, the Facebook Pixel gave us all the information we needed to create effective audiences for our ads. Then VPNs, ad blockers, and other privacy software started generating data disparities. This is where the Facebook Conversion API comes in.
CAPI is iOS14-friendly.
With iOS 14, however, we are dealing with gaps rather than anomalies in the data. Gaps have a detrimental influence on Facebook ad targeting. This is because iOS 14 restricts the amount of data that marketers can acquire via client-side (pixel) tracking and allows users to disable tracking (via ATT) completely.
CAPI provides user data directly from your server to Facebook, rather than depending on the cookie and browser data collected by the Facebook Pixel.
In other words, you collect and transmit the data, not Facebook.
CAPI catches significant lower-funnel activity.
With the Facebook Conversion API, you can communicate more than simply website behavior to Facebook. Not all server-side events occur and/or are recorded directly on your website. They may occur on your app, free tool, third-party payment tool, support hub, or offline (by phone calls). If you keep this information in your CRM, you can transfer it to Facebook via CAPI.
Events in payment and shopping cart tools are frequently lower-funnel, making them very crucial to monitor.
CAPI will be required when the cookies are gone.
But, most crucially, once third-party cookies are removed, the Conversions API will be our sole source of conversion tracking and ad effectiveness data.
Facebook Conversion API vs Facebook Pixel
Yes, the Facebook Pixel accomplishes the same goal, but in a different manner and with different consequences.
The Facebook Pixel is a piece of code that is placed on your website and sends a cookie to Facebook’s server (Ads Manager) anytime someone who has interacted with your Facebook Ads performs an action on your site. Cookies are saved in the user’s browser, making it a browser-dependent conversion tracking tool.
In contrast, the Conversions API is a server-side conversion tracking tool. So the same user behavior data is captured but saved on your server (rather than in the browser), with the API connecting the site to Facebook’s.
So, as illustrated above,
With the conversions API, your website collects data, which is then kept on your server and supplied to Facebook via API.
Facebook captures data using cookies, stores it on the user’s browser, and sends it to Facebook via the pixel.
How does the Facebook Conversion API work?
Although this may appear to be a highly sophisticated process, it can be simplified by breaking it down into stages.
Let me walk you through the very basics of how the Facebook Conversion API works:
The customer visits the website.
The website must include a Facebook Pixel. Facebook Pixel stores first-party user data in cookies.
The server will save user data in the same way as it stores IP addresses, user agents, Google Analytics client_id, and other characteristics.
When a user (with saved user data) triggers an event, the server sends a request to the Facebook server with information about the event and the user data.
What types of events can Facebook CAPI track?
The Conversions API can track all of the same fundamental events that Facebook Pixel does, including:
Add payment information.
Add to Cart.
Add to Wishlist.
Customize the product.
Complete registration
Contact us via phone, SMS, email, or chat.
Donate
Search for your store’s location on a website or app.
Begin checkout.
Lead Page View
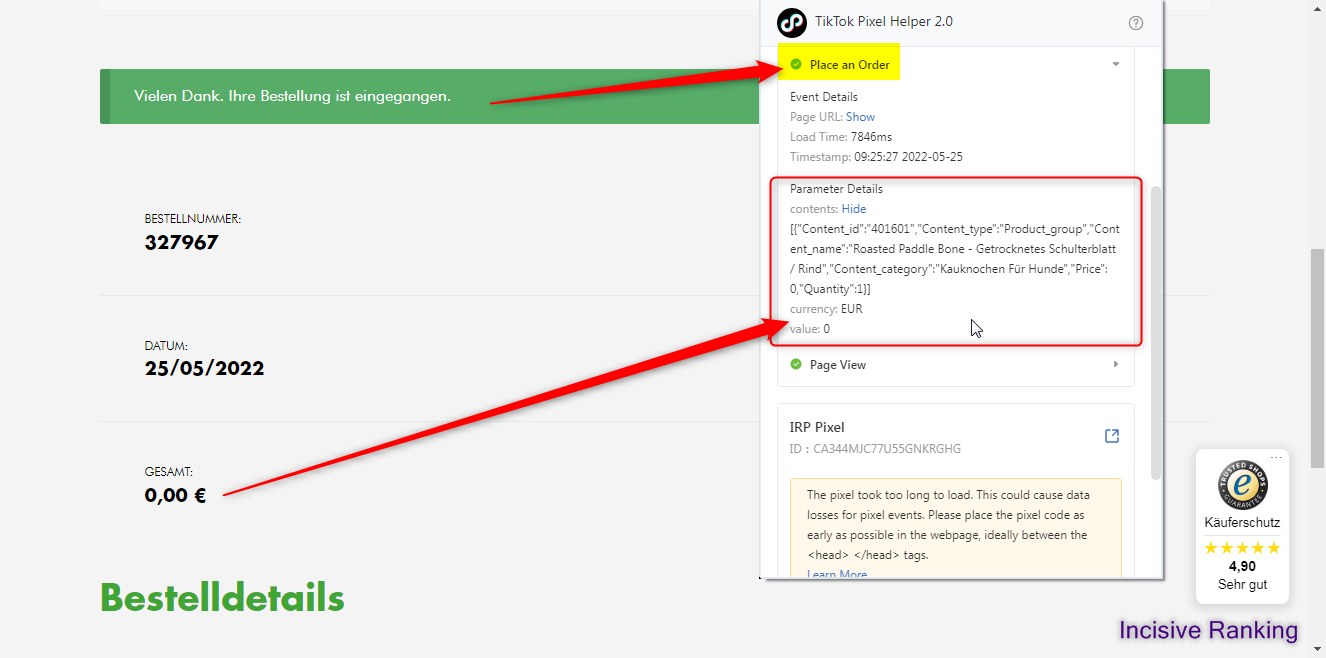
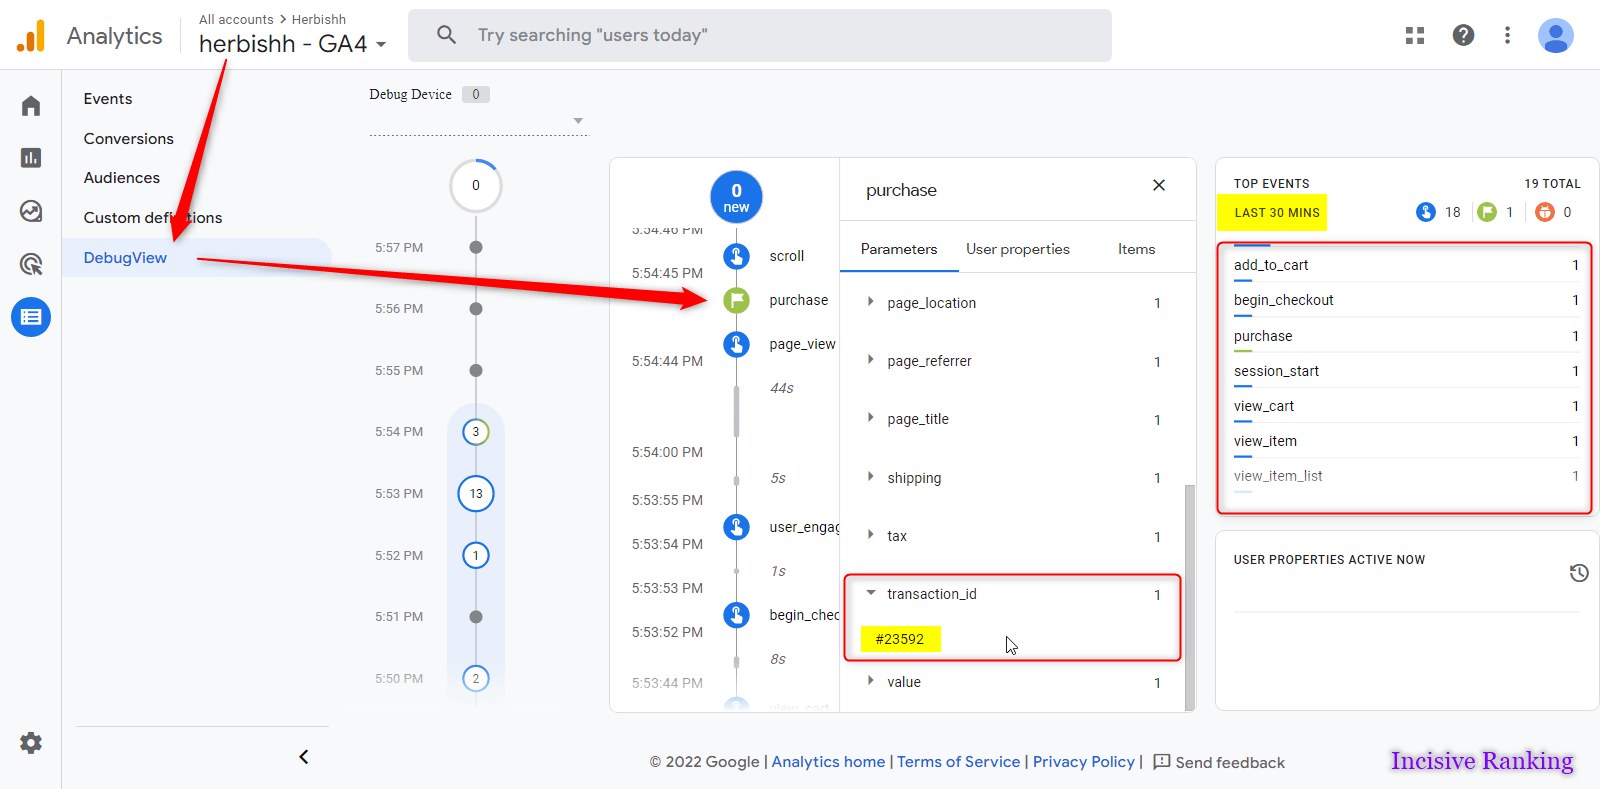
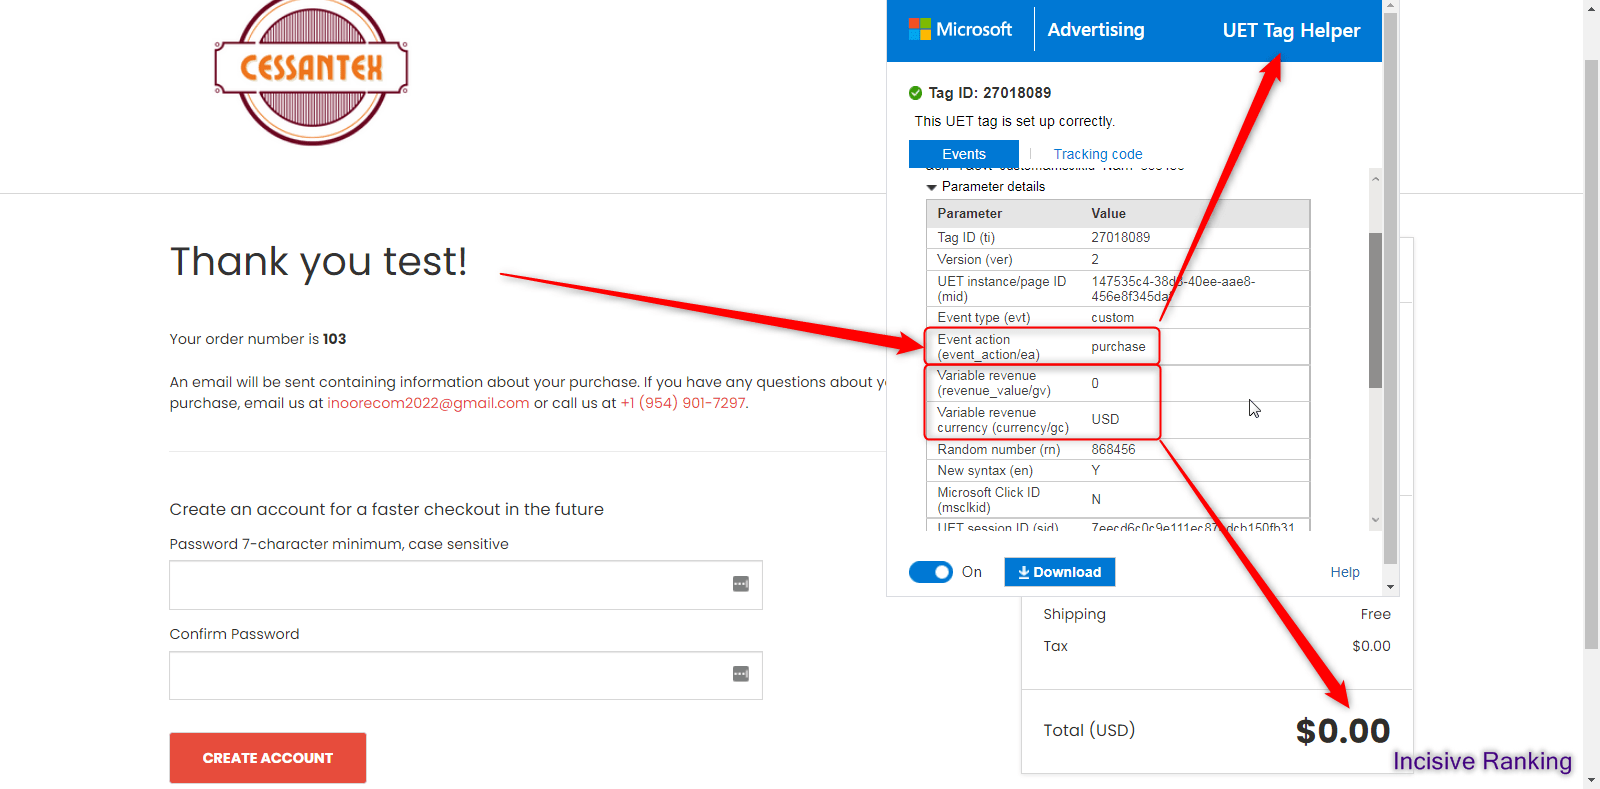
Purchase
Schedule an appointment
Search for sight.
Start Trial
Submit application, subscribe, and view content.
Are you facing any issue with setting up Facebook Conversion API Tracking?
There are three alternative approaches to start the implementation process. You can determine which fits you best based on the following criteria:
If you have Shopify, you can start setting up CAPI right away. (Scroll down below to learn how)
If you use WordPress, WooCommerce, or another CRM, you can utilize their plugins to set it up in a similar way as Shopify. (Additional documentation can be found here)
If you have a bespoke site, you can utilize a tool like Zapier to send data, but it will cost you. You can also hard code/have a developer install this on your server. If you choose this option, we recommend holding until after Q4, as it can take up to two weeks to properly evaluate the customization. (Additional documentation can be found here)
How to Set Up the Shopify Integration
Step 1: Go to your Shopify store’s home screen and click on the apps page to install the new Facebook Sales Channel App.
Step 2: To proceed, you must input your specific Facebook user login credentials. We strongly urge that if you are an agency attempting to implement something for a client, you have them complete this step. If your agency and customer ever split ways and you are removed from the app, the CAPI & Pixel installation will lose all connectivity.
Step 3: Shopify will ask for confirmation that “you wish to integrate Facebook into the Shopify platform”.
Step 4: Using the Facebook sales channel app, validate each of the assets you’re bringing into Shopify. If you or your client handles several assets, go through each asset drop down to confirm that the relevant item is selected.
Please ensure that Automatic Advanced Matching is set on. This will save you steps later on and ensure that Shopify sends all important customer data to Facebook for user matching purposes.
Step 5: Review and decide which functions and features Shopify will have access to. In this case, we have switched on all features that allows us to oversee Facebook account activity directly from the Shopify platform. This is also relevant if you plan to open Facebook and Instagram shops later.
Step 6: Once the Facebook Sales Channel App has been set up, navigate to the settings. From here, we will go to the data settings and enable CAPI.
Step 7: Once you’ve entered the data sharing settings, we’ll need to verify three things:
Make sure that tracking is enabled.
Select Maximum to combine all data-tracking parameters and launch the Conversion API.
Confirm that the appropriate pixel is connected within the app. If this is not your pixel, detach it and you will be prompted to connect the proper one.
Note: Even after these components have been validated, the purple confirm button may remain greyed out. If this is the case, you must navigate to the Commerce settings in the center column to accept Facebook’s commerce terms and conditions. Once completed, you should be able to proceed to confirm the data-sharing options.
Step 8: Once activated and confirmed, you are all set! However, you must return to the home screen and select the Shopify Preferences tab (which contains the Universal Pixel ID). Remove it and save your settings.
Note: If you hardcoded the Facebook pixel into your Shopify site, now is the time to delete it from all related liquid or theme pages. Events will be double-counted if this isn’t done.
Step 9: Finally, verify that browser events are firing properly on your site. Note that we have only observed add to cart and purchase events fired from the server side so far, but we expect more of these events to become available over time as sites rely more on server-side data to be given to Facebook.
Do you want to setup Facebook CAPI through Google Tag Manager?
Go to your Events Manager first. After you’ve chosen your pixel as the data source, navigate to Settings.
Select the Choose a Partner option.
Step 2: Select WordPress. You will next be guided through the installation process.
Step 3: Go to your WordPress website’s Plugins menu and click “Add New.” Look up “Facebook for WordPress” (you can also download it here). Then, install and activate the plugin.
After activation, navigate to the plugin’s settings and select “Get Started.”
Step 4: You will need to connect in to your Facebook account.
Step 5: You’ll then need to choose your Business Manager, Facebook Page, Instagram Profile, Ad Account, and Pixel.
Step 6: Keep “Manager Your Business” turned on, otherwise it may affect access to the API.
Step 7: Here’s the essential part. You may need to refresh your WordPress page to view this.
Step 8: The token is what is utilized with the API. Now you need to check this box.
After you confirm, reload the page again (it’s not extremely dynamic). You should then see a checkbox indicating that you are sending web events over the Conversions API.
It’s Done, Yayy.
Now at last,
Step 9: Confirm it’s working.
You’ll have to resist the impulse to instantly check whether events are being received over the API. It may not appear for several hours. I would wait a day. Of course, what you see may vary depending on the amount of traffic and activities you’ve scheduled.
Then, return to your Events Manager and select the pixel as your event source. The Connection Method column should contain both Browser and Server.
If you only see Browser, it’s possible that the event hasn’t occurred since you connected to the API.
When you see the Server transmitting events, you’re done!
In conclusion, the Facebook Pixel’s effectiveness has decreased due to various blockers, like Apple’s iOS 14 update, but the Facebook Conversion API offers a solution by allowing direct data sharing from your server to Facebook, ensuring accurate tracking and targeting for marketing success. So as of now, you must implement Facebook Conversion API on your website to see effective results.
We are experts in Tags and Tracking Services. With experience in eCommerce and Custom Conversion tracking, Server Side Tagging, and Data tracking to help you get the advantage of ACCURATE data for better decision making. With more than 6 years of experience, We have already delivered more than 500 projects.
 24")
 25")
 25")
 25")
 27")
 28")
 29")
 30")
 31")
 32")
 33")
 34")
 35")
 36")
 37")
 38")
 39")
 40")
 41")
 42")
 43")
 44")
 45")
 46")
 47")


